Comprehensive Guide to Convert EDB Files to PST with Free Solution
The following guide will give you a detailed overview of how a user can convert EDB to PST format using different ways. As most of us have an idea about various procedures, having detailed knowledge about the process is necessary. Any misinterpretation during the process can result in permanent data loss.
Thus, we have created a blog that will provide you with a clear picture of how you can execute the conversion process in a seamless manner.
1st Procedure – Using Exchange Admin Center
In the first step, we are going to use Exchange Admin Center to convert EDB files to PST. It is considered one of the simplest ways to perform the conversion. However, this procedure is successful only in Exchange 2013 and newer versions.
But before directly starting the process, there are a couple of pre-requisites that you must take into consideration. Without these steps, you might fail to convert your Exchange EDB files.
EDB to PST Conversion Pre-Requisites
Please create a shared folder to perform conversion.
Grant the Mailbox Import Export role to the mailbox from which you want to export data.
To assign the role, you can go to the Exchange Admin Center and carry out the following steps:
- Login to EAC >> Permissions >> Admin roles.
- Double-click on the Recipient Management option to open it and click on the Add option.
- Now, click on “Mailbox Import Export” role under the Select a Role page. Then click on Add >> OK.
Steps to Convert Exchange EDB Files to PST Using Exchange Admin Center
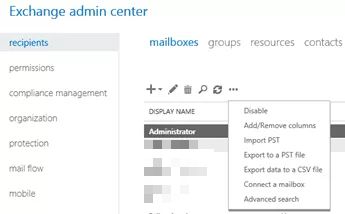
- Open Exchange Admin Center >> Recipients >> Mailboxes. Here, you will get a list of all the mailboxes.
- Choose the mailbox from which you want to get data in PST file and right-click on it. Then, click on Export to a PST file option.
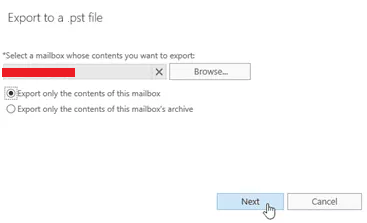
- Now, browse the required mailbox >> choose “Export only the contents this mailbox” option >> Next button.
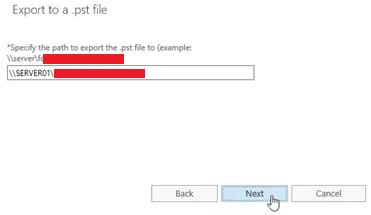
- Select the destination path where you want to save the resultant PST file.
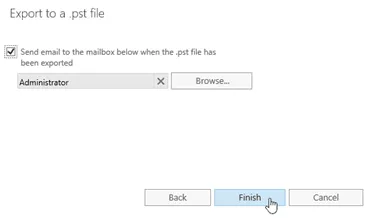
- You can also enable the option to receive an email to the mailbox after the EDB to PST conversion process is completed.
- Finally, click on the Finish button.
Shortcomings of Using the Above Procedure
Although the aforementioned process is a simple one, there are a couple of drawbacks associated with it:
- Need to create a Network Shared Folder path.
- Cannot convert corrupt EDB mailbox.
- Might feel a little complex / lengthy to a non-technical user.
- Works only in Exchange 2013 and later versions.
- Requires Live Exchange Environment to complete the process.
Now if you are not content with the first procedure to convert EDB files to PST for free, then the next process involves the use of PowerShell commands.
You Might Also be Interested to Know How to Open PST Files Without Outlook
2nd Procedure – Using Exchange Management Cmdlet
Most of the IT and Exchange administrators prefer running the PowerShell cmdlet to convert Exchange EDB to PST. Although it is a complex process, it supports the conversion from Exchange 2007 and is compatible with later versions of Exchange as well.
In the following section, we will be discussing how a user can carry out the process using the New-MailboxExportRequest command. But let us first discuss the pre-requisites involved in it.
Pre-Requisites While Converting EDB to PST Using PowerShell
The demands to perform conversion are as follows:
- The user who is going to run these PowerShell commands in Exchange Management Shell must have administrator rights.
- There is a common requirement of having the Mailbox Import Export role assigned to the user mailbox. You can either use Exchange Admin Center to grant the role as discussed above or use Exchange Management Shell. In EMS, you need to run the following command:
“New-ManagementRoleAssignment -Role “Mailbox Import Export” -User “<Username or alias>”
The destination folder in which the data will be saved must be a shared one. For this, right-click on that folder and click on the Sharing tab. Here you can see the Sharing status and path of the folder.
Exchange PowerShell Cmdlet to Perform Conversion
The Exchange Management Shell involves the use of the New-MailboxExportRequest command to convert EDB files to PST for free. You can run the following command to initiate the process:
New-MailboxExportRequest -Mailbox <Mailbox Name> -FilePath <Destination Path>
Once you run this command, a new export request will be created that will start running the process in the backend. You can check the export progress by running the below cmdlet:
Get-MailboxExportRequest
After the process is completed successfully, you must remove the export request using:
Remove-MailboxExportRequest –Identity <Export Request Name>
Finally, the process of EDB to PST Conversion is completed using PowerShell cmdlet.
Drawbacks of EMS
There are a couple of drawbacks associated with the PowerShell commands:
- Expertise to run these cmdlets in Exchange Management Shell is required.
- Not a feasible solution for non-tech users.
- High chances of error messages if there is any mistake while entering cmdlets.
- A live Exchange Server environment is needed.
Opting for these manual solutions to convert EDB files to PST is not a feasible task for many users. Although these are free solutions, there are a set of pre-requisites and complexities that are associated with these procedures. Thus, many experts recommend going with an automated solution instead of these procedures.
Final Words
Being an Exchange expert for many years now, it is one of the most common queries asked by the users how to convert EDB files to PST for free. Therefore, in this article, I have explained both ways i.e. Exchange Admin Center and Exchange Management Shell PowerShell cmdlets to get the job done. However, looking at the complexities and drawbacks involved, I would highly recommend going with some third-party application to have a seamless conversion process.


