How to Migrate OLM to Office 365 Manually?


In this article, we will discuss How to Migrate OLM to Office 365 manually? if you are facing similar issues, then this blog will be helpful for you.
The most popular data interchange and storage platform for large and small companies alike in the cloud, since it is the safest and most cost-effective. Outlook for Mac files is risky and sensitive to corruption since they are located in the system folder and not on the web.
Corruption is always a danger. Microsoft 365 simply requires login information and is available on any machine. It offers various services, including Microsoft Exchange Online, Outlook for the Web, SharePoint, Yammer, OneDrive, etc. Another benefit of cloud computing is that the service is accessible from anywhere.
The Microsoft 365 platform is highly flexible in plans, subscriptions, and features.
Why should You move Outlook for Mac files to Office 365’s Outlook for Windows?
Only Macbooks can get the right of entry to the OLM documents in Outlook for Mac. This restricts the capacity of Office 365 to replace the regionally stored calendar.
Here are a number of the alternative motives to replace Outlook for Mac with Outlook for Windows and migrate OLM documents.
- Outlook for Mac lacks functions that include message recall, vote casting buttons, and Ignore and Clean Up actions.
- Outlook for Mac customers can best preview attachments in mail messages regionally. There isn’t anyt any auto-archive for folders or the function to identical messages in different formats, which includes HTML o TXT.
- With Outlook for Mac, customers can not personalize the folder order or alternate the folder retention policy.
- Outlook for Mac does now no longer use HTTP to connect with Exchange, which can compromise security.
- It isn’t always feasible to manipulate Exchange Server distribution lists the usage of Outlook for Mac.
- Outlook for Mac does now no longer connect with Exchange over HTTP, which might also additionally damage security.
How can you import OLM files to Outlook for Microsoft 365 for Windows?
When customers import.olm documents constructed from Outlook for Mac into Outlook for Windows, the error “The document. olm isn’t always an Outlook information document” appears (.pst).
The information needs to be transformed to PST documents earlier than migrating to the Windows-primarily based totally Outlook patron. Here are a few approaches to Import OLM Files to Outlook for Microsoft 365 for Windows.
Importing Data with Exchange Server
If an Outlook for Mac consumer is attached to an Exchange Server, the Outlook for Windows patron might also additionally view the mailbox’s contents. This is feasible due to the fact the Windows patron can connect with the Exchange Server through the usage of both Cached Exchange Mode or Online mode.
Following that, the import-Mailbox shell cmdlet in Microsoft Exchange PowerShell can be used to migrate mailbox information to PST documents.
Migrate OLM to Office 365 using manual Techniques
Here is a beneficial step-with the aid of using-step guide:
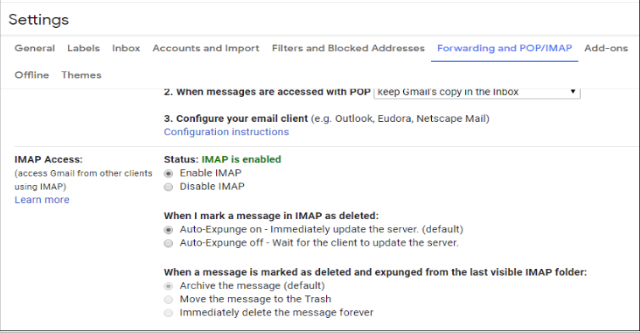
- Go on your Gmail account settings. Select “IMAP ” withinside the “Forwarding and POP/IMAP ” tab, after which click on “Save changes .”
- Select “Accounts” from the ‘Tools ‘ menu.
- .A new window will open on the screen, withinside the backside left corner, click on the “+” button to set up Gmail with Outlook on the Mac.
- Click “Add Account ” to create your IMAP account and offer the specified details.
- Gmail outgoing server is “smtp.gmail.com,” whilst receiving server is “imap.gmail.com.”
- Remember to tick “Use SSL to connect” for every server. That will upload the IMAP account on your Mac Outlook. You have to now sync Gmail labels to Mac Outlook.
- Open Gmail and click on the tools icon, then click on Settings and pick Label.
- Use the Create New Label button to create a brand new label.
- To create the brand new label, open the Mac Outlook account and pick out the ‘Send/Receive button.
- After upgrading, sync the OLM document with the IMAP e-mail account. migrate all the OLM information to an IMAP e-mail account.
Configure Outlook on a Windows device to use the chosen IMAP account, then export data to PST files. Following that, you may import PST files into Office 365.
Disadvantages of Using the Manual Method
Primarily, the guide approach is time-ingesting and resource-intensive. In addition, shifting OLM information to IMAP is a hit-and-leave out process, considering that you can lose crucial information because of troubles that include interrupted Internet connectivity, device shutdown, etc.
Transfer of OLM to IMAP best migrates emails and messages, and due to this, you can not import the whole OLM information to Office 365 manually. Transfer to Office 365 is facilitated with the aid of using the usage of an automatic program that permits the complete migration of OLM documents.