How to Add a Shared Mailbox in Outlook Office 365?


So today in this article I will explain to you How to add a shared mailbox to Outlook Office 365? if you are also searching to access shared mailbox to outlook office 365 then this article will be helpful for you.
Microsoft 365 shared mailboxes allow many users to have their email account yet utilize the same email address for everyone. Having teams do basic emailing jobs easily helps organizations. A shared mailbox may be viewed by several members if the owner permits it.
In Microsoft 365, utilizing a shared mailbox is simple, but for Outlook users, it may be confusing. We’ll show you how to utilize a shared mailbox in Outlook
Things to Consider Before Using Outlook’s Shared Mailbox
Before utilizing a shared mailbox in Microsoft Outlook 2013, 2016, or 2019, remember to check these two things:
- Microsoft office 365 must-have shared mailboxes.
- Configure Outlook to sync with office 365 account.
- You have access to the shared inbox.
When Microsoft 365 access you to the shared mailbox, then restart the MS Outlook. Open Outlook, shared mailbox will be shown in folder pane after the main mailbox. In such a case, you may access the shared mailbox by yourself.
Microsoft Outlook: Adding a Shared Mailbox
It consumes a lot of time for shared mailboxes to appear in Outlook. Whether this technique doesn’t function for you, you may apply it manually as follows:
- choose the File tab in Microsoft Outlook.
- select Account Settings to the main menu.
- Make sure the proper account is selected from the Email tab.
- Under the Change email setting, click Change.
- Another new page will open on your computer’s screen; select the More Settings button and then select the Advanced button.
- Enter the admin’s shared email address and select OK.
- Then, choose Next>Finish>Close.In MS Outlook, the shared mailbox will therefore display under the main one. You may now be sending and receiving emails from this address

How to Use a Shared Mailbox in Microsoft Outlook
Users may upload files after enabling the shared mailbox to Outlook. And then see how to send emails from Outlook’s Shared Mailbox.
- Fresh message in Outlook folders. On the display, a new notification screen opens.
- From the ‘…’ link, choose Show From.
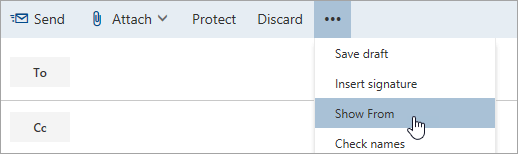
Note: Here, ‘Show From‘ indicates that the recipients will get the mail from a shared mailbox address.
- When you initially open the shared mailbox, Users must provide the following email address in the From field:
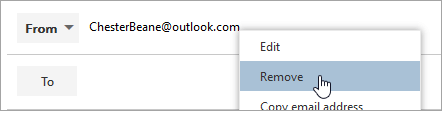
- Remove the ‘From’ option and right-click on it.
- So that further emails sent by the shared mailbox will display in the ‘From’ list.
- To new recipients, just enter their email into the box provided.
- Start with the topic and now compose your message.
- Type the message, then click Send.
Sender: Shared Mailbox.
Calendar sharing

The shared mailbox calendar is accessed by all users. As a member, you may add, modify, and remove activities. As long as you have the shared mailbox calendar, the following procedures may help you. The instructions are provided for Outlook webmail.
- Log in to Outlook.com account, then click Calendar.
- In the Calendar menu, click Other Calendar and choose Open Calendar.
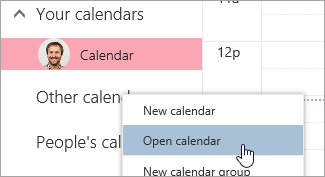
- In ‘From Directory‘, pick the Shared mailbox associated with Calendar, and then select Open.
- It will display on your Calendar menu.
Conclusion
Another wonderful feature of Microsoft 365 is shared mailboxes. As a result, we wrote this article to assist such users in adding shared mailboxes to Microsoft Outlook.